วันพฤหัสบดีที่ 16 มีนาคม พ.ศ. 2560

Nunit3 Running on command line

Nunit3 Running on command line

Prepare...

1. Download & install "Nunit3-console.msi or Nunit3-console.zip"

 Run...

2. Open CMD.exe 

3. Go to Path  of Nunit3-console.exe "cd Path"

ex. "cd C:\Users\Documents\Visual Studio 2015\Projects\nunit-console"

4. Complie your code at visual studio 2015 for get UnitTestProject.dll

5. Run UnitTestProject.dll on CMD "nunit3-console path+UnitTestProject2.dll"

ex. nunit3-console "C:\Users\Documents\Visual Studio 2015\Projects\ConsoleApplication1\UnitTestProject2\bin\Debug\UnitTestProject2.dll"


Library 

--where "cat == //A category assigned to the test
nunit3-console "C:\Users\Documents\Visual Studio 2015\Projects\ConsoleApplication1\UnitTestProject2\bin\Debug\UnitTestProject2.dll" --where "cat == A"

--where "method == //only a method
nunit3-console "C:\Users\Documents\Visual Studio 2015\Projects\ConsoleApplication1\UnitTestProject2\bin\Debug\UnitTestProject2.dll" --where "method != TestMethod1"

--where "name == //all test mathod name
nunit3-console "C:\Users\Documents\Visual Studio 2015\Projects\ConsoleApplication1\UnitTestProject2\bin\Debug\UnitTestProject2.dll" --where "name == TestMethod1"

--where "class == //all test attributed in this class
nunit3-console "C:\Users\Documents\Visual Studio 2015\Projects\ConsoleApplication1\UnitTestProject2\bin\Debug\UnitTestProject2.dll" --where "class == UnitTestProject2.UnitTest1"

--where "test == //all test attributed in this class
nunit3-console "C:\Users\Documents\Visual Studio 2015\Projects\ConsoleApplication1\UnitTestProject2\bin\Debug\UnitTestProject2.dll" --where "test == UnitTestProject2.UnitTest1"


--workers=
nunit3-console "C:\Users\Documents\Visual Studio 2015\Projects\ConsoleApplication1\UnitTestProject2\bin\Debug\UnitTestProject2.dll" --where "class == UnitTestProject2.UnitTest1" --workers=7

วันพฤหัสบดีที่ 9 มีนาคม พ.ศ. 2560

Selenium Java Quickly Setup on Eclipse


Selenium Java Quickly Setup on Eclipse

Prepare...

Hint: It's very sensitive about version!! 
Hint 2: Download Type 32 bit is better...

Eclipse neon [Download & Install]

https://www.eclipse.org/downloads/download.php?file=/oomph/epp/neon/R2a/eclipse-inst-win64.exe

Java JDK [Download & Install]

http://www.oracle.com/technetwork/java/javase/downloads/jdk8-downloads-2133151.html

Chrome Driver [Download]

https://chromedriver.storage.googleapis.com/index.html?path=2.27/

Geckodriver (V 0.14) [Download]

https://github.com/mozilla/geckodriver/releases

Firefox Browser [Install]


Chrome Browser [Install]


===============================================================

To do....

1. Create Java Project

include main

2. Put every thing in your Project Path

chromedriver
geckodriver

3. Import Library of Selenium By get Code from this site

https://mvnrepository.com/artifact/org.seleniumhq.selenium/selenium-java/3.2.0
https://mvnrepository.com/artifact/org.seleniumhq.selenium/selenium-server/3.2.0

4. Insert to  pom.xml in Project @ Eclipse. It's auto-update.

  <dependencies>
  <!-- https://mvnrepository.com/artifact/org.seleniumhq.selenium/selenium-server -->
<!-- https://mvnrepository.com/artifact/org.seleniumhq.selenium/selenium-server -->
<dependency>
    <groupId>org.seleniumhq.selenium</groupId>
    <artifactId>selenium-server</artifactId>
    <version>3.2.0</version>
</dependency>

  <!-- https://mvnrepository.com/artifact/org.seleniumhq.selenium/selenium-java -->
<!-- https://mvnrepository.com/artifact/org.seleniumhq.selenium/selenium-java -->
<dependency>
    <groupId>org.seleniumhq.selenium</groupId>
    <artifactId>selenium-java</artifactId>
    <version>3.2.0</version>
</dependency>
  </dependencies>

5. Code test here "Run on Firefox"

package testSelenium;

import org.openqa.selenium.WebDriver;
import org.openqa.selenium.firefox.FirefoxDriver;

public class test {

public static void main(String[] args) {
// TODO Auto-generated method stub
        WebDriver driver = new FirefoxDriver();

        // And now use this to visit Google
        driver.get("http://www.google.com");
        // Alternatively the same thing can be done like this
        // driver.navigate().to("http://www.google.com");
     // Should see: "cheese! - Google Search"
        //System.out.println("Page title is: " + driver.getTitle());
        
        //Close the browser
        driver.quit();
        
}

}

6. Code test here "Run on Chrome"

package testSelenium;

import org.openqa.selenium.By;
import org.openqa.selenium.WebDriver;
import org.openqa.selenium.WebElement;
import org.openqa.selenium.chrome.ChromeDriver;
import org.openqa.selenium.firefox.FirefoxDriver;

public class test {

public static void main(String[] args) throws InterruptedException {
// TODO Auto-generated method stub
System.setProperty("webdriver.chrome.driver", "chromedriver.exe");

 WebDriver driver = new ChromeDriver();
 driver.get("http://www.google.com/xhtml");
 Thread.sleep(5000);  // Let the user actually see something!
 WebElement searchBox = driver.findElement(By.name("q"));
 searchBox.sendKeys("ChromeDriver");
 searchBox.submit();
 Thread.sleep(5000);  // Let the user actually see something!
 driver.quit();
}

}

วันจันทร์ที่ 6 มีนาคม พ.ศ. 2560

C# Complier and Run Without Visual Studio

C# Complier and Run Without Visual Studio

If you don't have any file.cs To do this below.

Open Notepad

1. Put this code

using System;
using System.Collections.Generic;
using System.Linq;
using System.Text;
 
namespace Chapter1
{
    class Program
    {
        static void Main(string[] args)
        {
            Console.WriteLine("This is my First C# Program");
            Console.ReadLine();
        }
    }
}

2. Save with "Chapter1.cs"


==============================================

Open Visual Studio Command Prompt.

0. cd yourFolder ie. cd C:\Users\Documents\Training

1. Complier> "csc Chapter1.cs"

2. Run> "Chapter1"

Output!!
This is my First C# Program

วันอาทิตย์ที่ 5 มีนาคม พ.ศ. 2560

Selenium C# Setup Tutorial with visual studio

Selenium C# Setup Tutorial with visual studio

Start With Selenium!

Automate test is famous so, we go learn tool now.

1. Install "Visual Studio 2015"++
2. Open new "website Project"


เพิ่มคำอธิบายภาพ

3. Getting new web form


4. Hit "Tool" > "NugetPackage" > "Management Solution..."


5. Hit "Browse" >  Search "Selenium" > Install "WebDriver", "Support"
Choose "Chrome/IE/Firefox"


6. Double Click on "Default.aspx.cs" then put your code.


7. Example code

using OpenQA.Selenium;
using OpenQA.Selenium.Chrome;
using System;
using OpenQA.Selenium.Support.UI;

namespace ConsoleApplication1
{
    class Program
    {
        static void Main(string[] args)
        {
            using (IWebDriver driver = new ChromeDriver())
            {              
                driver.Navigate().GoToUrl("http://www.google.com/");

                IWebElement query = driver.FindElement(By.Name("q"));

                query.SendKeys("ถุงเท้าขายส่ง");

               query.Submit();

                WebDriverWait wait = new WebDriverWait(driver, TimeSpan.FromSeconds(10));
                wait.Until(d => d.Title.StartsWith("cheese", StringComparison.OrdinalIgnoreCase));

                Console.WriteLine("Page title is: " + driver.Title);
                Console.ReadLine();
            }
        }
    }
}


วันอังคารที่ 14 กุมภาพันธ์ พ.ศ. 2560

Line number setting in Visual Studio

Line number setting in Visual Studio 

1.Open Visual Studio 
2.Click "Tool" on top menu
3. Click "Options..."

4. Select "Text Editor" then Click "All Languages"
5.  Select "Line numbers" in check box
6. Click "OK"


Setting Theme Visual Studio

Setting Theme of  "Visual Studio"

1.Open Visual Studio 
2.Click "Tool" on top menu
3. Click "Options..."

4. Select "Environment" then Click "General"
5.  Select "Dark" in Drop down list
6. Click "OK"


วันจันทร์ที่ 12 ธันวาคม พ.ศ. 2559

พัทยา.....พาเพลิน สำหรับมนุษย์เงินเดือนเวลาน้อย (Pattaya Guide Tourism )

พัทยา.....พาเพลิน สำหรับมนุษย์เงินเดือนเวลาน้อย 

(Pattaya Guide Tourism )


พัก 1 คืนที่ The now

บรรยากาศด้านนอก บริเวณที่จอดรถ เดินมาทางด้านหน้าจะมองเห็นทะเล ซึ่งมีถนนกั้นอยู่ มีบาร์&ร้านอาหาร (กลางคืนเหมือนร้านเหล้านั่งชิล) โซนoutdoor จะปูพื้นด้วยหญ้าเทียม


เข้ามา check-in ได้ตั้งแต่ 14.00 check-out ก่อน 12.00 
เดินมาcheck-in ที่ Lobby เก็บภาพมาได้เยอะแยะเลยค่ะ
ผนังและพื้นเป็นปูนเปลือย ให้ความรู้สึกดิบๆมากๆ 
ทุกที่ๆเป็นมุมถ่ายรูปจะมีคำว่า The now กำกับอยู่เสมอเลย >///<


ชอบตุ๊กตา monster ink มากๆ พี่ๆทุกคนออกมาต้อนรับ ยิ้มแย้มแจ่มใส ช่วยยกกระเป๋ากันขยันขันแข็ง ^_^ 


เดี๋ยวมาต่อ.......

วันจันทร์ที่ 21 พฤศจิกายน พ.ศ. 2559

หูฟัง iPhone7 ทำพิษ......

หูฟัง iPhone7 ทำพิษ......


1เดือนผ่านไป ...............
เราเป็นคนที่ใช้หูฟังบ่อยมาก


ตอนเช้า จะเดินฟังเพลง และคุยโทรศัพท์ทุกวัน

ปัญหา คือ เราเปิดฟังเพลงก่อน หลังจากนั้นค่อยโทรออก พออีกฝั่งรับสาย ปรากฏว่าได้ยินเสียงเราเบามากๆ ลองปรับเพิ่มลดเสียงก็ไม่หาย ในที่สุดก็ลองถอดสายหูฟังแล้วเสียบใหม่อีกฝั่งถึงจะได้ยินเสียง เป็นทุกเช้าเลยค่ะ วันแรกก็คิดว่านิดหน่อยช่างมัน แต่พอผ่านมาเดือนนึงแล้วมันก็รู้สึกแย่เหมือนกัน ;(


ตอนเย็น จะใช้เล่นฟิตเนส ฟังเพลงระหว่างวิ่งออกกำลังกาย

ปัญหา คือ เราจะดูอนิเมะขณะวิ่งบนลู่วิ่งไปด้วยค่ะ พอเปลี่ยนมาใช้ หูฟังiPhone7 พบว่าเมื่อเราเหงื่อออก จะมีไฟฟ้าสถิตย์ สปาคแปลบ!! ที่สายหูฟัง สะดุ้งเลยค่ะ แรกๆนี่ทนวิ่งๆไป ช็อตจนได้ยินเสียง เปรี๊ยะ !! สะดุ้งจนลู่ข้างๆหันมามองเลย T^T ตอนนี้เลยอดดูอนิเมะ/ฟังเพลงระหว่างวิ่ง เซงมากๆ

โดยส่วนตัวคิดว่า จะลองนำหูฟังไปเคลมกับ Apple เผื่อว่าปัญหาที่เกิดขึ้นจะเนื่องมาจาก หูฟังของเราอันนี้! (ไม่ใช่หูฟังทุกอันของApple) 

ถ้าซ่อม/เปลี่ยนใหม่ หวังว่าจะหายเป็นปกติ 

🍀🍀 I wish.........I am a lucky girl. 🍀🍀

วันอังคารที่ 25 ตุลาคม พ.ศ. 2559

Review iPhone7 VS iPhone6s

iPhone7 VS iPhone6s  

บทความก่อนหน้า >> แกะกล่อง iPhone7 ( unboxing iPhone7 ) ;) เกาะกะแส หูฟังในตำนาน


      ว่าแล้วก็ไปหยิบ iPhone6s ของคุณแฟนมาเปรียบเทียบดู พลิกหน้าพลิกหลัง ตะแคง ตีลังกาผาดโผน ถ่ายรูปมาเก็บไว้ลงบล็อค ถ่ายรูปเองไม่ค่อยเก่งเลยได้รูปมาไม่กี่รูปเอง (รูปสวยๆที่ลงคือคุณแฟนถ่ายให้)


iPhone7 สีทองนะค่ะ

ส่วน iPhone6s สีRose Gold ค่ะ (ไม่ได้ถ่ายรูปแบบไม่มีเคสไว้ค่ะ Y^Y)

มาไขความข้องใจกันเลยค่ะ... :)

ด้านหลัง เส้นสีขาวหายไป กลายเป็นสีทองด้านเรียบๆทั้งสวยงามมากค่ะ 
และแผ่นฟิลม์กันรอยจะเป็น 1 ชิ้น ไม่หลุดง่าย (iPhone6s เป็น3ชิ้น)
ตัวกล้องหลังจัดวางต่ำลงมา และชิดซ้ายมากกว่าเดิม ทำให้ใช้เคสของ iPhone6s ไม่ได้ค่ะ (T^T)

iPhone7 VS iPhone6s  


ด้านหน้า เหมือนเป๊ะ!
iPhone7 VS iPhone6s

ด้านตูด 555+ ที่หายไปคือรูหูฟัง3.5นั้นเอง

ถ้าสังเกตดีๆ(ตั้งใจสังเกตมากกกกกก) iPhone7 แอบบางกว่า iPhone6s นิดนึงด้วยค่ะ (wow! 0o0)


ด้านข้าง ปุ่มเพิ่มลดเสียงจะนูนออกมาเฉพาะปุ่มทั้ง2ปุ่มเลยค่ะ ต่างจากเดิมที่เป็นร่องตรงกลางที่ขี้ฝุ่นเข้าไปง่ายมากๆ

จบแล้วค่ะ มือใหม่หัด Review 
รู้สึกอย่างไรบ้าง comment บอกเป็นกำลังใจให้กันหน่อยนะคะ 

แกะกล่อง iPhone7 ( unboxing iPhone7 ) ;) เกาะกะแส หูฟังในตำนาน

สวัสดีค่ะ🦄 หลังจากที่ไปตกหลุมรัก Samsung Note4 มานาน...

วันนี้เป็นครั้งแรกในรอบหลายปีที่กลับมาใช้ iPhone ค่ะ (อีกครั้ง)


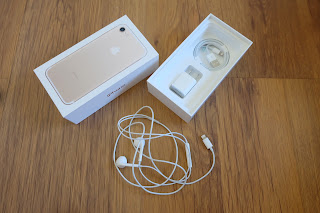
แกะกล่อง iPhone7 (unboxing) สี Gold


เปิดกล่องออกมานี่!!!....ตะลึงเลยค่ะ!


ตะลึงใน "ความเหมือนเดิม" ถึงแม้จะเห็นเครื่องโชว์มาบ้างแล้วก็ตาม😅


"หูฟัง" ที่รอคอยออกมาแล้วค่ะ

ว้าว...ไม่ใช่หัว3.5 อีกต่อไป ปลื้มมากค่ะ😂 (ก่อนซื้อเข้าใจว่าต้องต่อสายแปลงก่อนใช้หูฟัง)

เขย่า....วงการหูฟังกันเลยทีเดียว 🙌🏻

ตัวสายยาวขึ้น! ค่อนข้างเล็กและบาง พกพาสะดวก

หูฟังใช้หัวเดียวกับที่ชาตแบต 
 

แล้วถ้าอยากใช้หูฟังเดิมล่ะ จะทำยังไง......
Apple แถมสายแปลงมาให้ในกล่อง ด้วยค่ะ

.

 ด้านหนึ่งเป็นหัวที่เสียบตูดiPhone อีกด้านเป็นรู3.5ที่เสียบหูฟังแบบเก่า

แกะออกมาแล้ว เป็นสายสีขาวสั้นๆแข็งแรงดีค่ะ

นำมาลองเสียบตูดดู -0- ก็แปลกดีค่ะ

ดึงๆสายดู เสียบแน่นดีมากๆรูฟิตสุดๆ

สุดท้ายก็เลยอยากรู้ว่าแล้วมันต่างจากเครื่องiPhone6s อย่างไรกัน 
เลยไปขอยืมเครื่องแฟนมาเทียบดูค่ะ...... >>> iPhone7 VS iPhone6


Nunit3 Running on command line

Nunit3 Running on command line Prepare... 1. Download & install "Nunit3-console.msi or Nunit3-console.zip"  Run... 2....